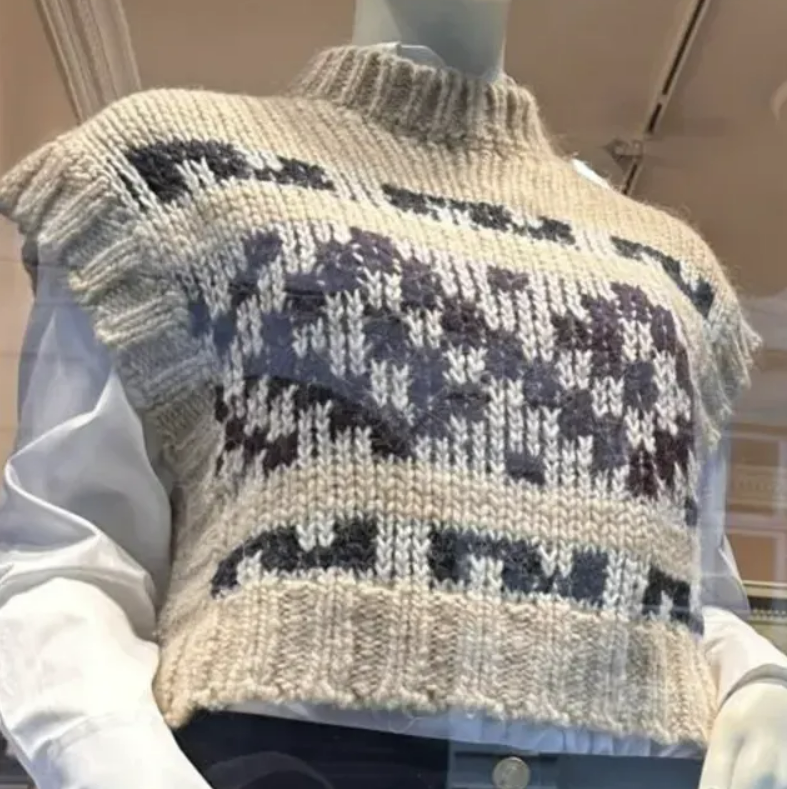
A modern cropped vest with zigzag bands and scattered diagonal motifs
24 stitches × 28 rows = 10 cm (4") in stockinette stitch on 4.0mm needles
26 stitches × 30 rows = 10 cm (4") in Fair Isle pattern on 4.0mm needles
Important: Each square = K2 in that color. Work each chart row twice (4 rows total per chart row) to create the 2×2 block effect.
Chart Instructions: Read RS rows from right to left. Repeat the pattern across your width.
| 17 | ||||||||||||||||||||||||||||||||||||||||||
| 16 | □ | □ | ■ | ■ | ■ | ■ | ■ | ■ | □ | □ | ■ | ■ | □ | □ | □ | ■ | ■ | ■ | ■ | ■ | ■ | ■ | □ | □ | ■ | ■ | □ | □ | □ | ■ | ■ | ■ | ■ | ■ | ■ | ■ | □ | □ | ■ | ■ | □ | □ |
| 15 | □ | □ | ■ | ■ | □ | □ | ■ | ■ | ■ | ■ | ■ | ■ | □ | □ | □ | ■ | ■ | □ | □ | ■ | ■ | ■ | ■ | ■ | ■ | ■ | □ | □ | □ | ■ | ■ | □ | □ | ■ | ■ | ■ | ■ | ■ | ■ | ■ | □ | □ |
| 14 | ||||||||||||||||||||||||||||||||||||||||||
| 13 | □ | □ | □ | □ | □ | □ | ■ | ■ | □ | □ | □ | □ | ■ | ■ | □ | □ | □ | □ | □ | □ | ■ | ■ | □ | □ | □ | □ | □ | □ | ■ | ■ | □ | □ | □ | □ | ■ | ■ | □ | □ | □ | □ | □ | □ |
| 12 | ■ | ■ | □ | □ | ■ | ■ | □ | □ | □ | □ | ■ | ■ | □ | □ | ■ | ■ | □ | □ | □ | □ | □ | □ | □ | □ | □ | □ | ■ | ■ | □ | □ | ■ | ■ | □ | □ | □ | □ | ■ | ■ | □ | □ | ■ | ■ |
| 11 | □ | □ | ■ | ■ | □ | □ | □ | □ | ■ | ■ | □ | □ | □ | □ | □ | □ | ■ | ■ | □ | □ | □ | □ | □ | □ | ■ | ■ | □ | □ | □ | □ | □ | □ | ■ | ■ | □ | □ | □ | □ | ■ | ■ | □ | □ |
| 10 | □ | □ | □ | □ | □ | □ | ■ | ■ | □ | □ | □ | □ | □ | □ | □ | □ | □ | □ | ■ | ■ | □ | □ | □ | □ | □ | □ | ■ | ■ | □ | □ | □ | □ | □ | □ | ■ | ■ | □ | □ | □ | □ | □ | □ |
| 9 | □ | □ | □ | □ | ■ | ■ | □ | □ | □ | □ | □ | □ | ■ | ■ | □ | □ | □ | □ | □ | □ | ■ | ■ | □ | □ | □ | □ | □ | □ | ■ | ■ | □ | □ | □ | □ | □ | □ | ■ | ■ | □ | □ | □ | □ |
| 8 | ■ | ■ | □ | □ | □ | □ | ■ | ■ | □ | □ | □ | □ | □ | □ | ■ | ■ | □ | □ | □ | □ | □ | □ | ■ | ■ | □ | □ | □ | □ | □ | □ | □ | □ | □ | □ | ■ | ■ | □ | □ | □ | □ | ■ | ■ |
| 7 | □ | □ | ■ | ■ | □ | □ | □ | □ | ■ | ■ | □ | □ | □ | □ | □ | □ | ■ | ■ | □ | □ | □ | □ | □ | □ | ■ | ■ | □ | □ | □ | □ | □ | □ | ■ | ■ | □ | □ | □ | □ | ■ | ■ | □ | □ |
| 6 | □ | □ | □ | □ | ■ | ■ | □ | □ | □ | □ | ■ | ■ | □ | □ | ■ | ■ | □ | □ | □ | □ | □ | □ | □ | □ | □ | □ | ■ | ■ | □ | □ | ■ | ■ | □ | □ | □ | □ | ■ | ■ | □ | □ | □ | □ |
| 5 | □ | □ | □ | □ | □ | □ | ■ | ■ | □ | □ | □ | □ | ■ | ■ | □ | □ | □ | □ | □ | □ | ■ | ■ | □ | □ | □ | □ | □ | □ | ■ | ■ | □ | □ | □ | □ | ■ | ■ | □ | □ | □ | □ | □ | □ |
| 4 | ||||||||||||||||||||||||||||||||||||||||||
| 3 | □ | □ | ■ | ■ | ■ | ■ | ■ | ■ | □ | □ | ■ | ■ | □ | □ | □ | ■ | ■ | ■ | ■ | ■ | ■ | ■ | □ | □ | ■ | ■ | □ | □ | □ | ■ | ■ | ■ | ■ | ■ | ■ | ■ | □ | □ | ■ | ■ | □ | □ |
| 2 | □ | □ | ■ | ■ | □ | □ | ■ | ■ | ■ | ■ | ■ | ■ | □ | □ | □ | ■ | ■ | □ | □ | ■ | ■ | ■ | ■ | ■ | ■ | ■ | □ | □ | □ | ■ | ■ | □ | □ | ■ | ■ | ■ | ■ | ■ | ■ | ■ | □ | □ |
| 1 |
With 3.5mm circular needle and MC, cast on 220 sts. Place marker and join to work in the round, being careful not to twist.
Work in K3, P3 ribbing for 5 cm (2"). This matches the chunky ribbed pattern visible on the sleeves.
Change to 4.0mm circular needle.
Setup Rounds: Knit all stitches in MC for 4 rounds (approximately 1.5 cm).
Begin working from Chart Row 1, repeating the 42-stitch pattern across your round (you'll work it approximately 5 times with some adjustment stitches).
Pattern Sequence:
Total patterned section: 60 actual knitting rounds = approximately 20 cm (8")
Total body length from ribbing to armhole: Approximately 28 cm (11")
Next Round: K11 (left shoulder), place next 50 sts on holder for armhole, K110 (front), place next 50 sts on holder for armhole, K11 (right shoulder).
You now have 132 sts for the vest front and shoulders.
Continue in MC only, working back and forth in stockinette stitch (knit RS rows, purl WS rows):
Work even for 8 cm (3").
Next RS row: K44, join new ball of yarn, bind off center 44 sts, K44.
Working both sides simultaneously with separate balls of yarn:
Row 1 (WS): Purl to end on both sides.
Row 2 (RS): On right side, knit to last 3 sts, K2tog, K1. On left side, K1, SSK, knit to end.
Repeat these 2 rows 6 more times. (37 sts remain each side)
Work even until armhole measures 20 cm (7.9").
Bind off remaining shoulder stitches.
With 3.5mm circular needle or DPNs and MC, pick up and knit 102 sts evenly around armhole opening (multiple of 6 for ribbing).
Work in K3, P3 ribbing for 3 rounds.
Bind off in pattern.
Repeat for second armhole.
With 3.5mm circular needle and MC, beginning at left shoulder, pick up and knit approximately 138 sts around neck edge (adjust to nearest multiple of 6). Join to work in the round.
Work in K3, P3 ribbing for 3 rounds.
Bind off in pattern.
Weave in all ends, especially where colors were joined.
Block gently to measurements. The 2×2 colorwork creates a naturally stable fabric.
Let dry completely before wearing.